Financial modelling: translating a great business idea into numbers
Financial Modelling is the technique that translates a good business idea into numbers. Organizations of all kinds, small or large, new or existing, use financial models to study the feasibility of new projects, project business and financial outcomes, and assess potential risks. Most financiers and investors require a structured financial model to support a new business, and the financial model is a centerpiece of the business plan.
Excel, of course, is essential for creating financial models. Other skills involve accurate knowledge of the business and the market, as well as corporate finance.
This is an area that combines different areas of knowledge. It makes considerable use of data and technology and has been evolving greatly in recent years.
Structure of a Financial Model
In order to create a financial model in excel, it is important to adopt a solid structure. Given the weaknesses of Excel, already pointed out at the beginning of this manual, it is recommended to separate input data, calculations and presentation of results in different parts of Excel, namely in different tabs.
A suggested structure for organizing tabs involves at least the following:
- Index
- Log
- Assumptions
- Calculations
- Results
- Other tabs, such as charts, Monte Carlo simulations, and more.
It is also important to clearly define the responsibilities of the various team members. It is quite common in complex models for several participants to contribute to the development of the same financial model.
Define responsibilities
In many companies there is someone responsible for defining the macro assumptions that are transversal to various models, other developers will be responsible for defining specific assumptions of a particular business area, while others are in charge of dealing with issues related to financing, for example. Clearly identifying who does what is essential.
Version control
Version control is also important in financial models with some complexity and where it is necessary to carry out several iterations and experiments. Sometimes, assumptions are questioned and new scenarios or variables need to be added. Depending on the results obtained, it may be necessary to go back and try a different combination of assumptions, etc.
Thus, a possible nomenclature would be as follows:
- Project Name: A name or code that identifies the specific project.
- Content Description: A brief description of what the file contains.
- Date: YYYY-MM-DD format to ensure chronological ordering.
- Version: A version number, which can include a letter for subversions.
- Author's Initials: The initials of the person who made the last modification.
Example of Naming:
NomeProjeto_DescricaoConteudo_AAAA-MM-DD_vX.X_INICIAIS.xlsx
Additional Considerations
- Use of Folders: Organize files into specific folders for each project or client.
- Backups: Keep regular backups of files to prevent data loss.
- Comments: Include comments in Excel about the changes made in each release.
Using Named Ranges
Another important recommendation is to use Excel's named ranges. Instead of using cell references, use named ranges. See the following advantages:
Clarity and Readability
- Descriptive: Named ranges make formulas easier to understand. For example, =VLOOKUP(A2, vendas_2023, 2, FALSE) is lighter than =VLOOKUP(A2, $B$2:$D$100, 2, FALSE).
- Implicit documentation: Names act as a form of documentation that makes the model more accessible to others (or to yourself in the future).
Ease of Maintenance
- Simple update: If the data range changes, you only need to update the named range once, and all formulas that use that name are automatically adjusted.
- Reference management: Less possibility of error when adjusting ranges, as it will not be necessary to search for and replace cell references manually.
Error Reduction
- Fewer cell references: Complex cell references can lead to errors, especially in large models. Named ranges reduce complexity.
- Consistency: They ensure that formulas always refer to the same range, avoiding discrepancies.
Easy Navigation
- Quick access: It's easier to find and select named ranges through the Name Manager or Name Box.
- Organization: They help keep the model organized, especially in large spreadsheets with lots of data.
Better Integration with Formulas and Functions
- Compatibility: Some Excel functions, such as SUMIF, COUNTIF, MATCH, INDEX, and OFFSET, become more powerful and readable when they use named ranges.
- Flexibility: Facilitate the use of matrix formulas and other complex operations.
Better Control and Auditing
- Tracking: They help track where and how data is used within the model, making audits easier.
- Transparency: They offer a clear view of the critical elements of the model and how they interact.
Protect cells and VBA code
In order to make the model safer, it is recommended to protect the cells, especially the cells with formulas. This is possible through the following menu item "Review":

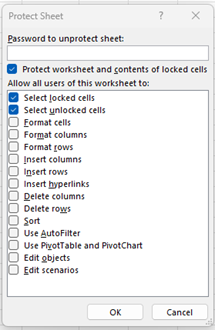
By clicking on "Protect Sheet", the following window shows several options, including the use of a password. By unchecking the options you want to protect, the user with whom you share the file will no longer be able to freely interact with it. You can protect the creation of new columns and rows, edit or delete formulas, and more:

As mentioned earlier, Excel file protection is not completely secure. It should be understood that it works more as a deterrent of unauthorized changes to an Excel file as an effective mechanism to protect against all kinds of threats.
The same can be done for VBA code, if used. To do this, the first step is to access the VBA editor through the "Developer" menu and click on Visual Basic:

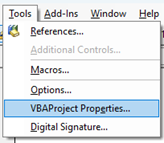
Alternatively, use the shortcut Alt+F11 to open the editor. With the editor open, in the Tools menu, select the item "VBAProject Properties...":

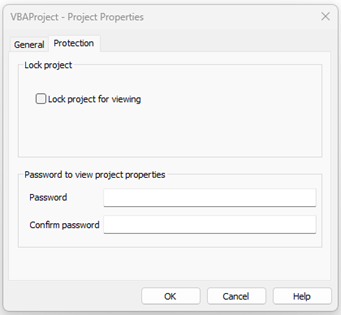
The following box opens where you can check the "Lock project for viewing" option and set a password:

